If you are using camcorders of Sony or Panasonic, you may not strange to this MTS format. Sometimes we would call it AVCHD files, cause AVCHD including MTS and M2TS. This is a popular Full HD format that enables you to record videos with 1920×1080 resolution. You can shoot HD footages with Sony/Panasonic camcorders in MTS format. However, this is not a friendly format for mobile devices as well as the media player natively of your PC.
In this case, if you want to play those MTS files on your Mac with QuickTime, you can get troubles. To make the playback easier, you probably need an MTS to MOV Converter to change MTS to MOV Mac. iOrgSoft AVCHD Converter Mac can be a helpful tool for you to make a simple conversion on MTS to QuickTime MOV on your Mac.
This AVCHD Converter Mac is a converter typically for converting AVCHD files as well as the recording format like MXF, M2T, MOD, TOD, etc. on Mac. It allows you to convert file in the formats above to other common used video formats like MP4, MOV, MPEG, FLV, WebM, etc. or common used programs like FCP, iMovie, Avid, Adobe Premiere, Sony Vegas, etc. and common used mobile devices like iPhone 4/4s/5, iPad, Nexus 4/7, Galaxy S3/S4, Galaxy Note, Sony Xperia, Surface Pro, etc. You can convert files to the target formats within a short time and use it easily.
Besides, you can make some modifications with this converter, such as to trim, crop, and to set the specific parameters to the videos. Below I’ll introduce how to do the converting and editing work with this converter for you.
Tips: If you are the Windows user, you can just freely download the Windows version iOrgSoft AVCHD Converter
Part One: How do I the conversion?
Step 1. Download iOrgSoft AVCHD Converter Mac and install it
You can free download the converter by clicking the download link and then please install it freely for ready.
Step 2. Import MTS files
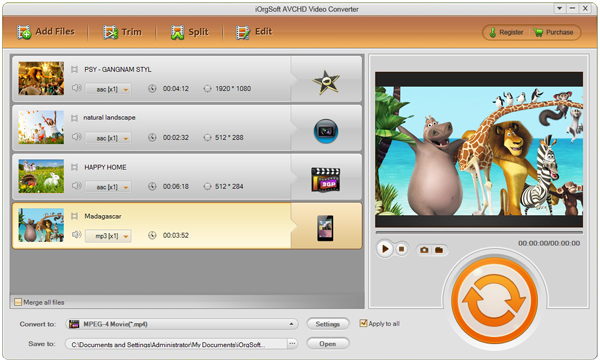
To add files, you can click the “Add File” icon in the top left. Then you can select the files you want to convert or edit. By the way, batch converting is available for you to convert bunches of files at a time.
Step 3. Set output format
After you importing the files, you can now choose a proper output format you want. In order to make MTS files playable in QuickTime, you should convert MTS to MOV. To make it, you should first hit the “Convert to” bar and then choose “HD Video” to “HD QuickTime Movie(*.mov)”.
Step 4. Start conversion
Finally, you can click the “Convert” button, that is, the big round orange icon, to start converting MTS to MOV for QuickTime playback. After the conversion, you can strike the “Open” button to find your converted files.
Part Two: How do I the editing?
1. Trim
If you want to save only several segments of the video, you can trim your videos by clicking the “Trim” button. Then you can drag the little triangle icon of the timeline to set the start point and ending point vaguely. If you want an exact time, you can set the exact time in the start time and end time bar. Then, if you want the trimmed segments to be joined together, you can tick the “Merge Trimmed Files”.
2. Edit
In “Edit” window, you can do cropping, adding special effects, and flipping, rotating. You can try by yourself, and it’s not difficult to operate.

3. Setting
This button is beside to the “Convert to” bar. If you click it, you can set the detail parameters like videos resolution, encoder, bitrate and frame rate, as well as the audio encoder, bitrate, sample rate and channels. If you don’t know exactly what they mean, then you can leave this function alone and convert the video format directly.


