


Sometimes you can get AVCHD files, or MTS/M2TS files with Canon camcorders. These would be HD video file. Camcorders of Canon, Sony, and Panasonic are usually output such video files, and there’s an inconvenience of this kind of HD video files, that is, their compatibility with other programs or devices are really poor. You can get troubles to play mts files on Mac with QuickTime, or import mts/m2ts to iMovie, FCP, etc for further editing.
It sounds really inconvenient, but the popular and easiest way to solve the codec problem like that is to use an MTS Converter to convert AVCHD files. And if you are using Canon camcorders, and want to do the conversion on Mac, you can use the iOrgSoft Canon AVCHD converter Mac to achieve that.


This AVCHD converter is typically designed for camcorder footages conversion that of converting MTS/M2TS/TS/M2T/MXF/TOD/MOD files to any other editing programs like FCP, iMovie, Sony Vegas, WMM, etc. or mobile devices like smartphones, tablets, PSP, etc.
Moreover, you can not only do conversion with it, but do some easy editing like trimming, merging, cropping, adding effects, flipping, etc. I’ll show how to convert AVCHD on Mac and how to make simple editing with MTS files in the following passage:
Step 1. Free Download the Canon AVCHD Converter Mac
To get start of the conversion, you should download the free trial of the converter at first and you can just click the download above to make it. Then install and launch the converter to get ready.
Step 2. Input MTS/M2TS files
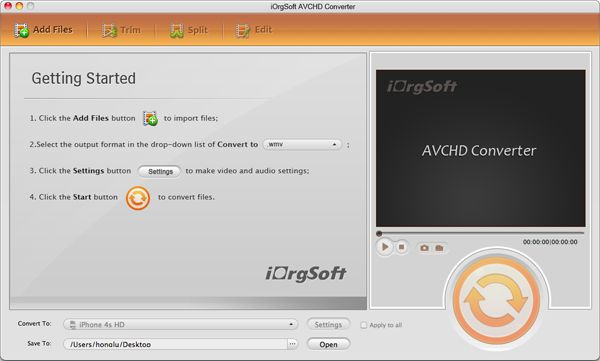
In this step, you can easily import your MTS/M2TS files simply by hitting the “Add File” button on the top-left corner. Or you can just drag the files you want to convert directly to the converter. Batch converting is supported and you can drag all the files that you want to convert to have the conversion at a time.

Step 3. Pick up the proper output format
This is the key step, and you need to choose the exact output format. You can do this selection by clicking the “Convert to” bar on the bottom and then you’ll see two parts of the formats column, the upper part is formats for programs mainly, and the lower part is for devices. You need only find the exact programs or devices and choose the certain format to output. If you want to MTS to MP4, then you may choose “Common Video”-> “MPEG-4 AVC(*.mp4)”.

Step 4. Go convert!
If you want conversion only, then this would be the final step for you. You can run the conversion by simply clicking the big round button on the low-right corner. Then wait for sometimes, and you can find the converted files by striking the “Open” icon on the left of the “Convert” button.
More about the editing:
1. Trim
To do trimming, you can just hit the “Trim” button besides “Add File”, and you’ll see the “Trim” window. You can set the start and end time by dragging the dog-ear icon on the timeline. Then if you want to join the segments that you clip, you can tick the “Merge Trimmed file” on the bottom of the interface.

2. Split
This button is next to “Trim” icon, click it and you’ll see the Split window. You can equal divide your videos by setting the time of a single segment, or due to how many segments you want.

3. Edit
In the “Edit” window, you can do such things, crop the size of your video by 4:3/16:9, add special effects, flip and rotate the footages.

4. Setting
If you are a professional user, you can also set the video resolution, encoder, frame rate, bitrate, and audio encoder, channels, bitrate, frame rate, etc. for your videos. This “Setting” button is just next to the “Convert to” bar.
